
Note: To read about 2 part silicone rubber molds look at this post:
A visitor from my Spanish Blog (Lady Vengeance) ask me how I did the resin copies of my Warhammer Lizardmen Kroxigor using Oyumaru.
First of all is that I don't want anybody to do something illegal with this tutorial. I'm just showing how I copy some of my original miniatures and I encourage you to only do the same thing.

This method is specially useful for small size pieces that we want to copy a small number of times, ranging from one to ten for example. If you want to make more copies or a copy of something big or really detailed I recommend to use other material for the molds, for example silicone rubber.
I. How to Make Molds with Oyumaru
The oyumaru is a material with a similar consistence of a hard rubber at room temperature that soften with heat application and can be use to acquire a certain form that will conserve once it cools down. The big advantage of this material is that it can be reshaped lots of times, making molds of certain pieces and then repeating the process to make molds of other pieces with the same material. I guess that with a big number of repetitions the material will end up degrading but for the moment I haven't had any problem and I have heated it a lot of times.
As the oyumaru never gets into a quasi-liquid state is quite complex almost impossible to reproduce the smaller details of the pieces e.g. small hold. Furthermore once the oyumaru is out of the heat source it will start to cold down and harden up,which is a problem with big pieces.
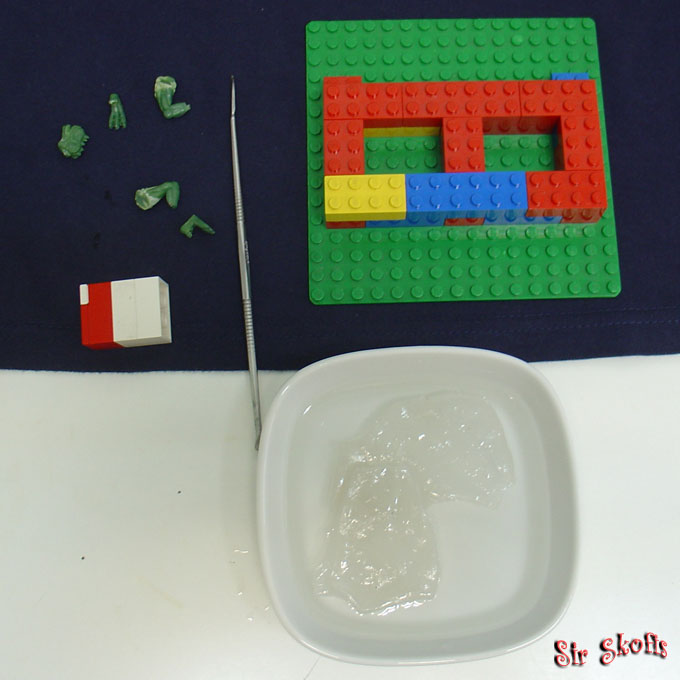
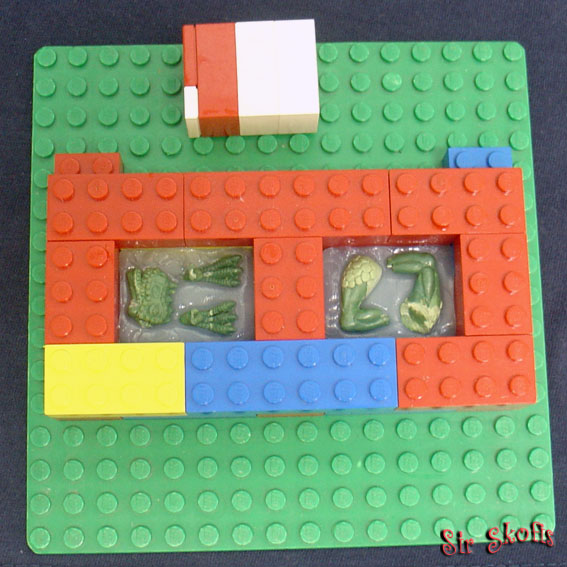
My brother and I use a slightly complex system to try to obtain the maximum level of detail possible. but there are other more simple ways to do the molds. The system that we use needs the things that you can see in the picture below:

- One or two water containers.
- Lego pieces: a base to hold the Legos, blocks of two point thickness and flat pieces.
- Oyumaru. In the picture above it can be seen two small unused transparent Oyumaru sticks and two bigger sized somehow greyish used oyumaru sticks.
- Some pieces that we want to make a mold of: The kroxigor head, legs and feet in my case.
- A sculpting tool to move the oyumaru in the containers with heated water and push the oyumaru around the pieces.
Is better to make smaller molds that a larger one that contains several pieces as the Oyumaru will have less time to cold down in a small mold and the copies will be more detailed. I have chose to make two separated molds: one with the feet and head and one with the legs. I could have done one for each piece but they are small enough pieces, making it unnecessary.
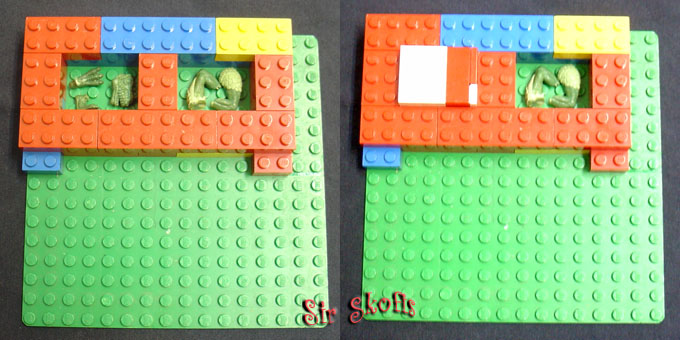
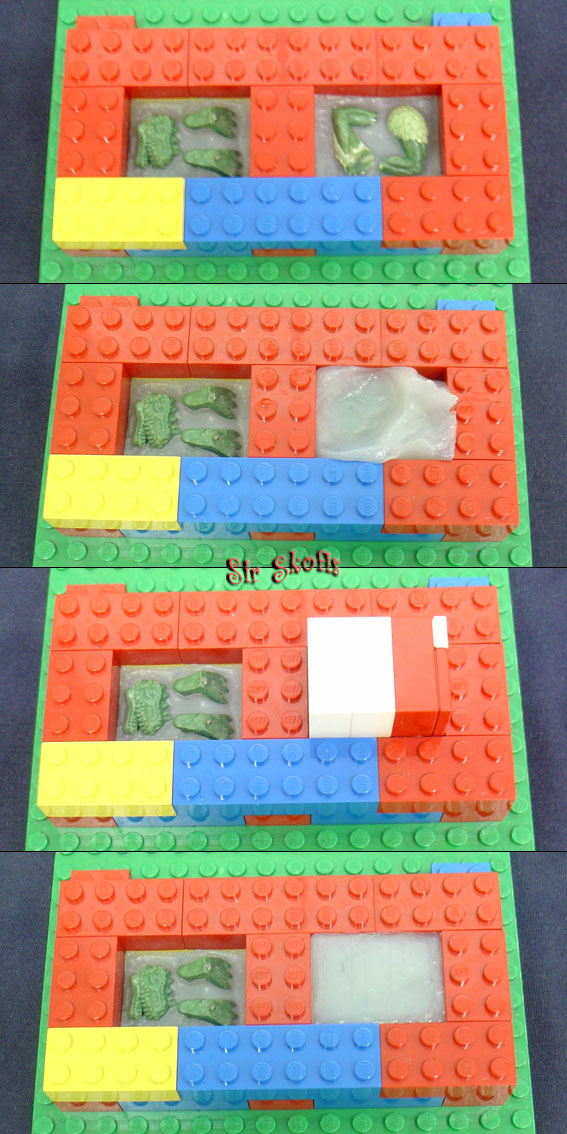
We place the pieces in the Lego base and build a Lego wall around them of at least two block high.
We also build a Lego-tool with some blocks that fits as close as possible in the holds inside the walls. This tool will help us to make pressure in the Oyumaru and force it to get inside the details of the pieces. On top of the blocks of the tool is necessary to put some flat pieces to hide the pointy ends.
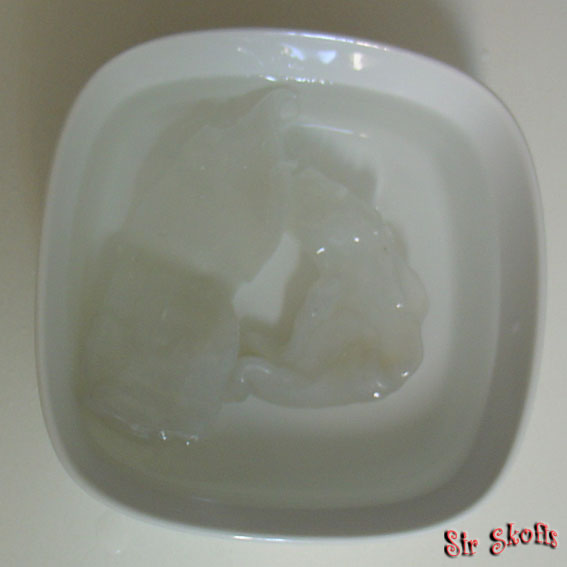
Step 2: Heating the Oyumaru
It is better to only heat the Oyumaru that you are going to need, but it is not easy to know how much you will need.
We are going to heat the Oyumaru using hot water. To heat the water you can use a kettle if you have one or the microwave oven for example (in Spain we don't usually have a kettle so I've used the microwave oven). I put some water in one container and heat it then place some Oyumaru in the water to soften it. when the water in that container is getting to cold I put other container with water to heat in the microwave oven and change the oyumaru form the container with the colder water to the one just heated using the sculpting tool as otherwise I will burn my finger tips.
I repeat that process until the oyumaru is soft enough. If you have a thick block of Oyumaru to heat I'll recommend you to flatten it while it is been heat or chop it to less tick pieces as it will heat quicker.

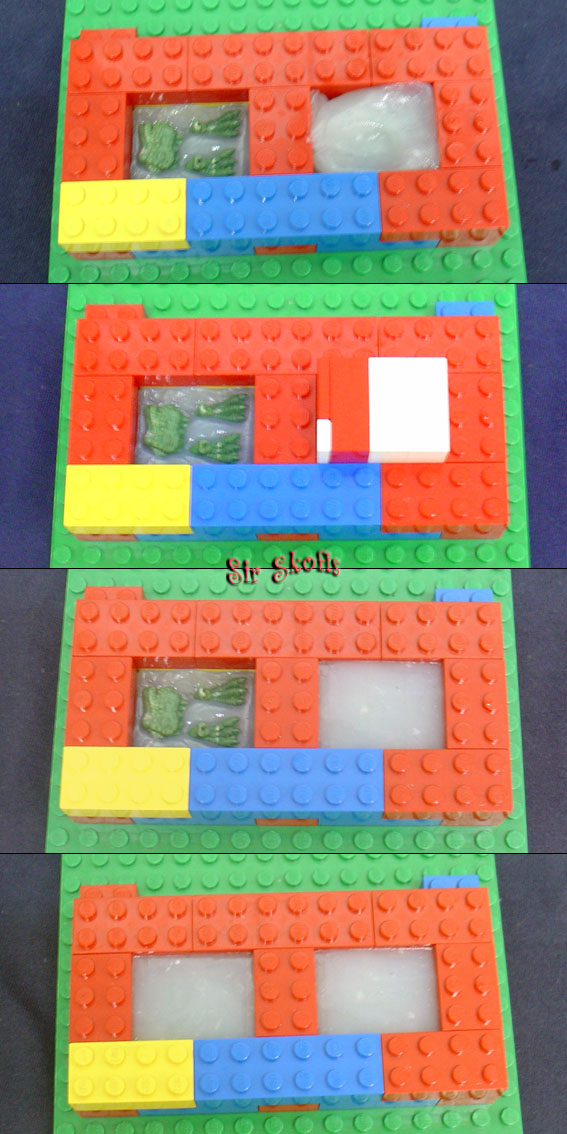
Step 3: Making the "draft" side of the mold
We are going to make a side of the mold that will help us make the next side but it will not be in the final mold. This is because we have found that is quite difficult to make a two part mold directly.
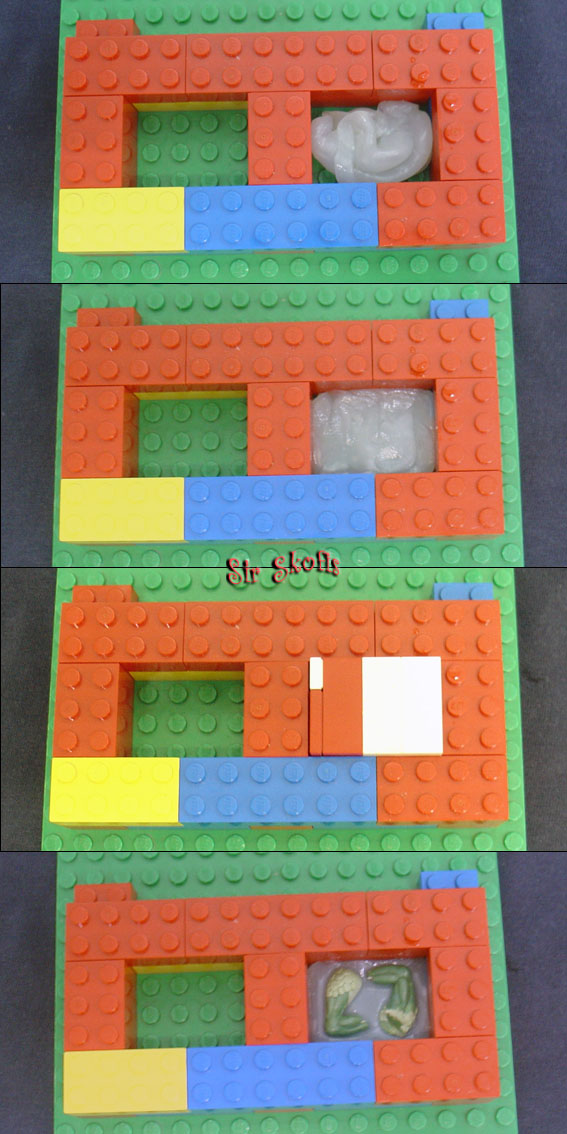
Once the Oyumaru is heated and the walls have been build we took some Oyumaru and place it in one of the holes inside the walls, we push it with our fingers and the sculpting tool so it covers all the surface, then we flatten it with the Lego tool. Afterwards we place the pieces that we want to copy and push them inside the oyumaru so they are half inside them. If necessary use the sculpting tool again to flatten the oyumaru around the pieces.
If you are making more than one mold do the same things for the others.
Now we wait until the Oyumaru cools down. We can accelerate the process putting it in the fridge.
Step 4: Making the side A of the mold
This is going to be the first useful side of the mold. We need more heated Oyumaru to make it.
Speed is quite important in this step if you are quicker you will have a more detailed mold.
We place oyumaru on top of the draft side of the mold and push it around with the fingers. Then we place the Lego tool on top of it and push really hard. Pressing the Lego tool on top of the oyumaru makes it get inside the details as long as the oyumaru is still hot, not only in the ones facing up but in every one as the pressure make on top will cause the lateral walls to also exert some lateral preassure. If the Lego walls were one "point" thick they will probably break while making pressure on the top side.
We left the side A of the mold to cool down.
Step 5: Separating the draft side from the A side
We start by separating the Lego walls from the Lego base and taking out the Oyumaru mold from inside the walls. The draft side has Lego "points" in its bottom face. The mold line between the draft side and the A side will be visible. With your fingers separate the two mold sides. It is better if you manage to leave the pieces stick to the A side.
Now put the Lego walls again in the Lego base and put inside the wall the A side of the mold. You can also break apart the walls and rebuild them around the side A of the mold.
Step 6: Making the B side of the mold
Basically follow the same process of Step 4.
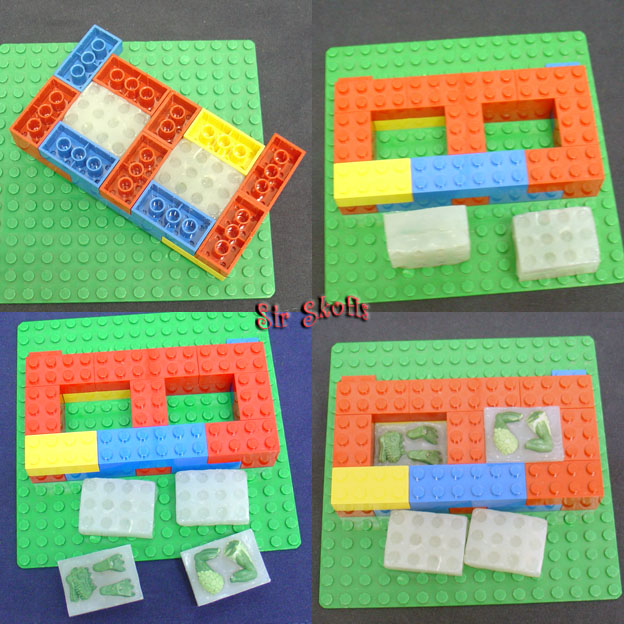
Step 7: Finished mold
If everything is in order, our mold will be finished. Break apart the Lego walls and take out the mold.
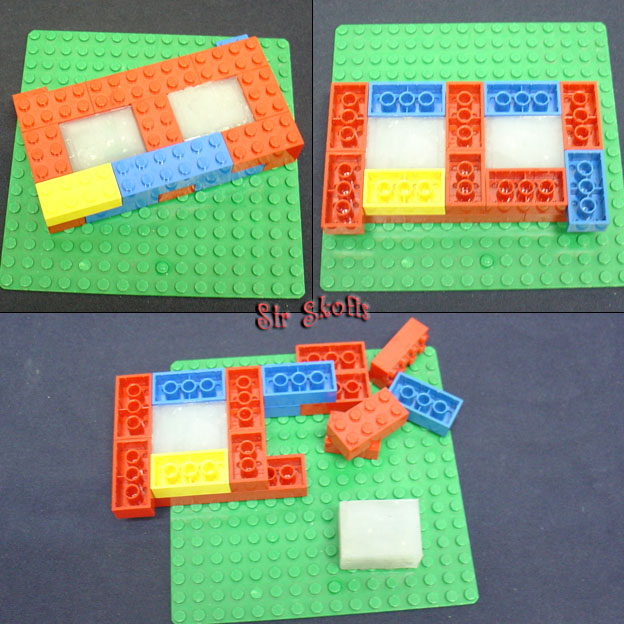
With your fingers separate side A and side B of the mold. It doesn't matter in which face the pieces end up.
Before continuing to the next phase check both sides of the mold to make sure there isn't any problems or defects. If any of the two sides has defects place the pieces in the other side and make a new side B of the mold.
Note: To read about 2 part silicone rubber molds look at this post:
http://sirskofisworkshop.blogspot.com.es/2014/11/how-to-make-two-part-silicone-rubber.html II. Resin Casting Parts
Once we have the mold is time to make some resin copies. I use a two compound resin called Ferropur PR-55 from a Spanish supplier, Ferroca. I'm sure that in other countries you have other suppliers that name their products differently, but in the end is all more or less the same.
For this part of the tutorial we are going to need:
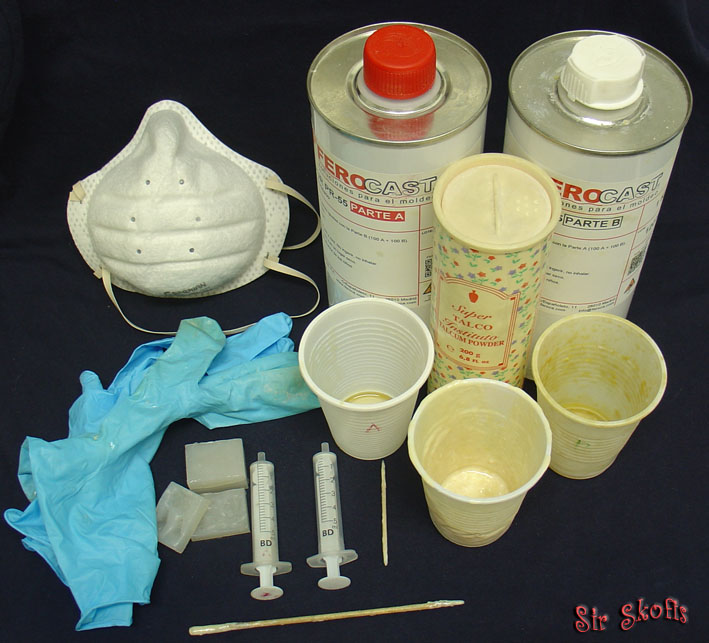
- Face mask to avoid breathing the resin fumes. We also do the resin casting in a well ventilated area.
- Gloves. The resin is toxic and it should not get in contact with your skin.
- Both Resin compounds (Part A and Part B).
- Talc/Talcum powders/Baby-powder, this help the surface finish of the copies
- Molds (Oyumaru or not).
- 3 plastic cups: one for the compound A, one for the compound B and one to make the mix. You should label them even if it is quite easy to recognize which is which.
- Two syringes: one for compound A and one for compound B. In this case is almost compulsory to label them clearly as it will be a real problem to mistake them.
- A stick of some kind to remove the mix. I use a wood chop stick, but some people have told me that is better to use not wood materials as they could contain some water and water and resin doesn't get along. Mi chop stick has a good layer of resin in its end so I think that now is quite waterproof.
- Another stick to push the air bubbles out of the holes in the mold. I use a toothpick, again people usually discourage the use of wood, but I haven't have any problems. From time to time I have to sharpen the point with a hobby knife as the resin tends to accumulate in it.
I have no picture of this. It's easier to work with both compounds in a plastic cup than take them directly from they containers, specially when the containers have been used and it is impossible to reach with the syringe the compound.
Step 2: Spread some Talc powder on both sides of the mold
This help the surface finish of the copies, drastically reducing the surface bubbles. The talc powder eliminates most part of the mold humidity and as I have said watter and resin don't go well together. In fact if they are mix together you will obtain something really porous and useless to miniature making. This trick also works with the silicone rubber molds.
Modus operandi: spread some talc powder, clap the mold with your hands first with the mold face up so the talc powder reach everywhere and then face down to take out the excess.

Step 3: Mixing the two compounds of the resin
The resin that I use needs the same quantity of compound A and compound B. Each mold will need a certain quantity of resin. I have no thumb rule to determine how much you will need, but the experience will help you to chose the right quantity. If you are short of resin you could put cured resin pieces of failed pieces inside the mold.
You can weigh the quantities but I find simpler to take the right quantities with a syringe, specially for small pieces. Is important to always take the compound A with one syringe and the compound B with another one. If you change the syringe a part of the resin will cure inside it and render it useless.
I take first the compound B of the resin that I use as it tends to crystallize and difficult the movement of the syringe piston. Then I take the compound A and pour both of them in the mixing plastic cup. Later on with the chop stick I remove both compounds for a few seconds (10 or so) as the resin will start to cure once both compounds get in contact, and the working time is around one minute.

Step 4: Casting the resin
Once both compounds are mixed pour the resin in both sides of the mold. Then take something pointy and try to free any air bubble trapped in the details. Some people think that introducing anything inside the resin will cause some air to get inside but I know that if you don't try to remove the air trapped bubbles they will remain there and ruin your copies. Another way to solve this problem is using a vacuum chamber but I don't have one.
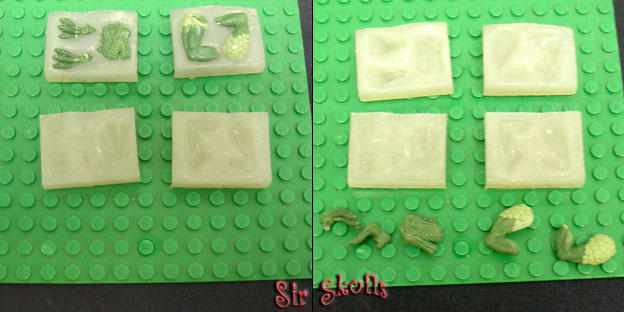
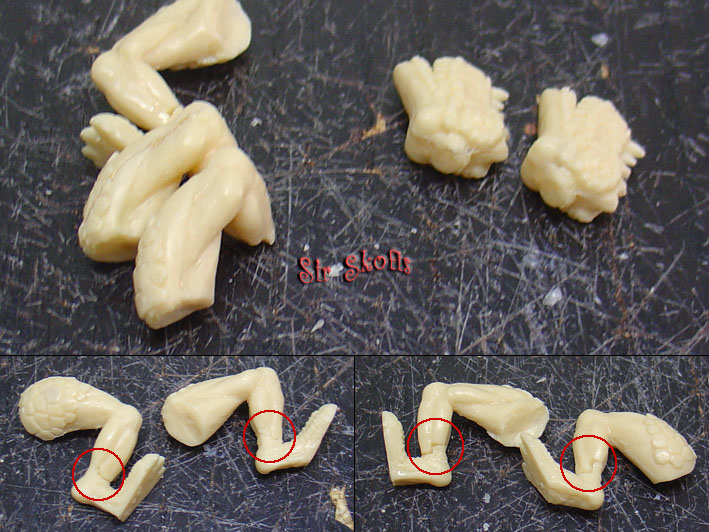
One really important detail is that the resin while curing release heat, and the heat at the same time make the resin to cure faster so it release more heat, etc. So the bigger pieces will release more heat and cure faster than the smaller ones. In the picture below you can see that the legs cure faster than the other pieces because they are bigger (3, 4 and 5). It is possible to know that is curing because the liquid becomes less and less transparent and acquire a white like color.

When the resin has started to solidify but it is not fully cured we put both sides of the molds together. This is because the resin will be less fluid and there is a lower risk that it ends up in the table instead of inside the mold. When you close the mold make pressure so if there is more resin than the resin needed it gets out of the mold. If no resin came out it could be a sign that you have been short of resin.
The supplier says that the curing time is 5 minutes but as I have said that depends on the quantity of the product used as more product release more heat and small pieces release less heat. I usually wait at least 10 minutes before trying to open the mold.
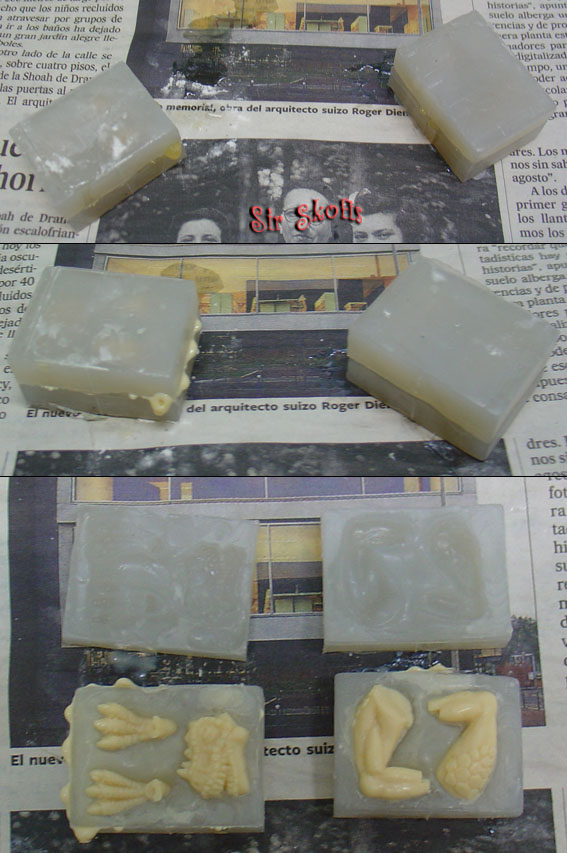
We now have a copy of the pieces. In the picture below you can see that the mold lines are pretty thin because we have apply pressure.
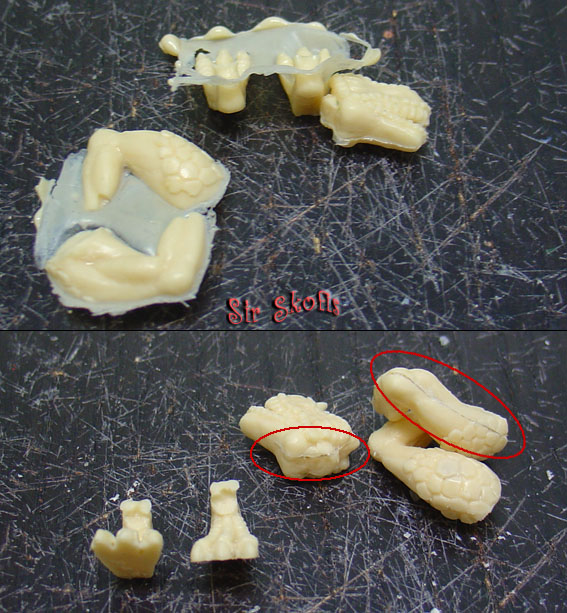
I did a second cast and in the picture below you can see that the defects are not a problem of the mold. I also wanted to know if the feet fit well with the legs before making a more permanent mold (silicone rubber mold) and as you can see they didn't fit perfectly.
Step 5: Cleaning
This is an important step. Once we are done doing copies we have to return the rest of compounds A and B that remains in the plastic cups to their containers (make sure you put each compound in its container). Before closing the containers clean with a paper towel the cap and where the cap goes specially if any compound tends to crystallize by itself (compound B in my case) because otherwise you can find one day that you are no longer able to open up the container. It has happen to me twice. I end up opening the container but it took half an hour.
We also clean up the syringes. Ideally we have push out every bit of compounds out of them but I found that rinsing them with some water helps to preserve the syringes. if you rinse them with water make sure to wait until they are totally dry before using them again or you will have problems when the water is mixed with the resin.
*****
That's all folks! If you like this tutorial let me know by leaving a comment or pressing the like button.
Muy bueno! Me gustó mucho!
ReplyDeleteObrigado. I'm glad you like it.
DeleteThank you!
ReplyDeleteFantastic tutorial. I now have new demon prince legs and a bunch of necrmunda guns. Thanks.
ReplyDeleteGlad It has helped you!
DeleteThanks
ReplyDeleteNice article, thank you for wonderful article
ReplyDelete3d Casting Newborn Baby Kit
This information is magnificent. I understand and respect your clear-cut points. I am impressed with your writing style and how well you express your thoughts.this review
ReplyDelete